
What are Swift Protocols?
The word protocol resides from deep inside Computer Science, and any one who has studied Computer Science will likely give you a textbook answer. However, those who have joined the industry without studying will probably use the word “interface”, which is a correct answer.
The word protocol is essentially a set of rules for computers or electronic devices to understand each other, and it lists the rules or the interface on which a computer can act upon.
This relates exceptionally well with programming using Swift Protocols because defining this interface in your application can be highly beneficial and is, in fact, best practice.
Defining the Swift Interface
To explain the definition of a Protocol, I will use my favourite analogy, building a house.
Imagine you have just acquired a piece of land and decided that you would like to build your own house, how exciting! So naturally, you’re eager to start digging and laying the first bricks, but this could get messy; how many bricks do you need to order, how much concrete is required, and how big your house will be?
All of these decisions need making before you begin and the best way to do this is by creating a house “blueprint”. This blueprint will be a drawing of the plans that will describe the dimensions, how high the house will be and more importantly, how bedrooms you’re going to need ;].

This blueprint is the same thing as “defining your application interface”. You’re going to do this with Protocols so that your application will know exactly what rules to go by.
Swift Protocol Example
To define a Protocol, we start by using the protocol keyword.
protocol House {

}
You have defined House as a protocol, and you’re going to start building out the “blueprint”.
protocol House {
    func numberOfBedrooms() -> Int
    func numberOfBathrooms() -> Int
    func numberOfFloors() -> Int
}
You have started building out the interface, and you can see that you’re returning three critical pieces of information required for your house build.
protocol House {
    func numberOfBedrooms() -> Int
    func numberOfBathrooms() -> Int
    func numberOfFloors() -> Int

    var occupants: Int { get }
}
Protocols can also define var properties, but only mutable properties are allowed; this is because this is only the implementation interface. You have just added the number of occupants living in this house.
Now that you have defined a virtual interface, you can pass this interface to your integration and allow them to create the implementation.
Swift House Implementation
You can now go ahead and create your very first implementation.
protocol House {
func numberOfBedrooms() -> Int
func numberOfBathrooms() -> Int
func numberOfFloors() -> Int
var occupants: Int { get }
}
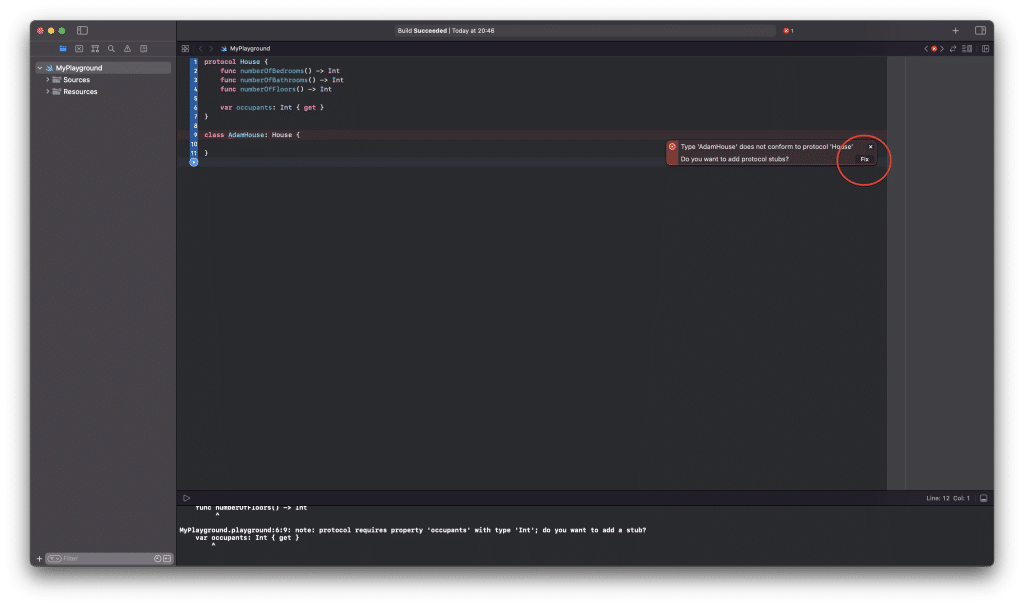
class AdamHouse: House {
}To conform to a Protocol, you do this by using : after the name of the class like in this example above. So here you have a class named AdamHouse which conforms to our House protocol.

You will immediately get an error, and this is because, by default, all the functions and properties are required to be implemented by your integration.
Xcode will automatically detect this and suggest inserting the protocol stubs using the “Fix” button.
protocol House {
    func numberOfBedrooms() -> Int
    func numberOfBathrooms() -> Int
    func numberOfFloors() -> Int

    var occupants: Int { get }
}

class AdamHouse: House {
    func numberOfBedrooms() -> Int {
        return 3
    }

    func numberOfBathrooms() -> Int {
        return 1
    }

    func numberOfFloors() -> Int {
        return 2
    }
}
You have now implemented all the required functions, and you’re building a lovely three-bedroom house. However, you’re likely to receive an error because we have not implemented the number of occupants in our House implementation.
protocol House {
    func numberOfBedrooms() -> Int
    func numberOfBathrooms() -> Int
    func numberOfFloors() -> Int

    var occupants: Int { get }
}

class AdamHouse: House {

    var occupants: Int

    required init() {
        self.occupants = 2
    }

    func numberOfBedrooms() -> Int {
        return 3
    }

    func numberOfBathrooms() -> Int {
        return 1
    }

    func numberOfFloors() -> Int {
        return 2
    }
}
You have now implemented the property occupants And you have created the required init function. All properties in Swift require an initialiser, and Swift is very strict about this. You can easily do this by using the above sample code.
Congratulations, you have now created your very first protocol and implementation.
Using the Implementation
In this final part of this tutorial, you’re going to explore using your implementation, and because this is a class, it’s effortless.
let house = AdamHouse()
print("Number of Bedrooms \(house.numberOfBedrooms())")
print("There are \(house.occupants) people going to be living in your house")
print("On \(house.numberOfFloors()) Floors")
You can easily create this implementation and find out the details.
You can also quickly write unit tests because it’s straightforward to create a mock object of this Protocol implementation and make sure it returns the correct number for each function.
What’s Next?
I hope you have enjoyed having a deep dive inside Protocols. They can be mighty, and you have only touched the surface. Using Protocols in your Swift applications will be extremely useful. You can start by defining a basic interface.
For example, if you’re building a Login journey flow, you can create the interface, and the implementation might vary depending on what platforms you’re integrating. For example, you might have an implementation for various social logins and email/password.
I look forward to seeing what you do next.
Do you want to learn more about Swift Protocols? Check out this great article from the official Swift website.

